The Ultimate Guide to Solar Panel Charge Regulators: How to Choose & Install One
Let me take a wild guess…
You are planning to set up an off-grid solar panel system and are trying to decide on the type of panels you need to use. The next step is connecting the panels with a battery unit for power storage.
But remember this: you will need a solar charge controller to prevent overcharging the batteries.
The fact is, a charge controller is necessary for the proper functioning of any battery-based energy system. And a solar charge controller needs to be sized depending on the system capacity and voltage.
The point is, choosing the right solar panel regulator depends on determining what works best for your system.
Want to learn more?
Let’s get down to business and learn more about solar charge controllers.
What Is a Solar Charge Controller?
It goes without saying that a solar panel will not produce current constantly. So, you need a battery to store the generated electricity and use it as needed.
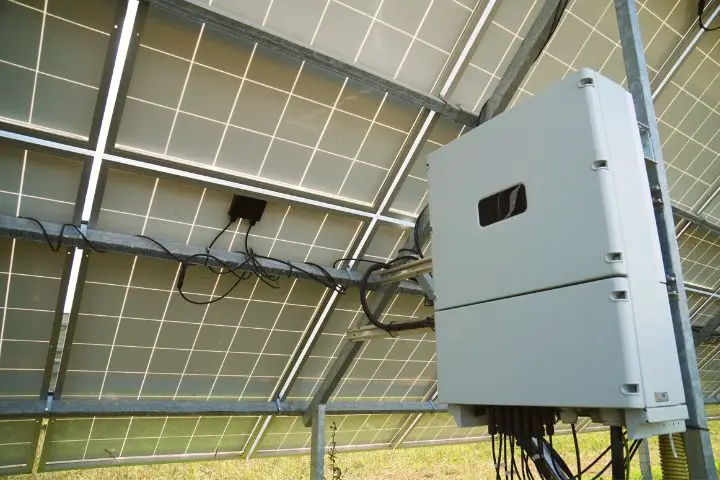
A charge controller works like a safety valve between the panels and the battery. The purpose is to ensure that the battery functions safely and effectively. In other words, it allows the flow of current in one direction only.
In the words of Amol Anand, the co-founder of a solar batteries start-up called Loom Solar, “Solar charge controllers primarily act as a gateway to your battery and ensure that you do not overcharge and damage your energy storage system.”
In theory, solar panels can be connected directly to a battery since both work on DC. But feeding the battery directly without a check will impact its performance and overall life.
As a battery begins discharging, there is a steady drop in the output voltage. A charge controller reads the battery output voltage to determine how much charge is left in it.
But it’s not just about being able to tell when enough is enough (quite literally). Once the charge percentage has reached a specific threshold, the so-called high voltage disconnect (HVD) point, the controller will disconnect it from the system. Some controllers also read the battery’s temperature and perform accordingly.
You may ask what happens during battery overcharging.
In most cases, overcharging causes the internal elements of the lead acid battery to heat up. And excess heat may easily spell trouble! Additionally, there’s a discharge of gases, mainly hydrogen, and oxygen, from the electrolyte in the battery. In extreme cases, these gases can ignite and cause an explosion.
The oxidation reactions resulting from this can reduce the cross-section of the positive grid of the battery and affect its current-carrying capacity. The overall impact? Not only does it get worn out faster, but it becomes more likely to die much sooner than it should.
Moreover, metals like high-purity lead in the positive plate are structurally stronger. Once oxidized into lead dioxide, the battery becomes structurally weaker and more likely to get physically damaged.
Even if you are using lithium batteries, overcharging can damage the battery interior structure and cause electrode decomposition. Note, that in this case, you will need a charge controller specialty designed for lithium batteries.
Solar charge controllers are available in various sizes ranging from capacities between 4.5A to 80A. According to financial forecasts, the solar charge controller market growth will grow to USD 1.98 million by 2032 from the present figure of USD 1.7 billion.
3 Main Functions of Solar Charge Controllers (Apart From Protecting the Battery)
Do all solar power systems require charge controllers?
Technically, no. If the capacity of the installed battery unit is much higher than the wattage of the panels, there is no risk of overcharging. They are not required for portable solar panels either.
Also, if your solar array is connected to the grid, you do not need a charge controller. Once the battery is full, the excess electricity will just happily feed into the grid.
But, the solar battery charger controller is not just about protecting the battery from overcharging. Here are a few other important tasks that a solar charge controller performs.
Blocking Reverse Current Flow
A solar charge controller also prevents batteries from getting over-discharged!
While this is not a major loss, a charge controller can easily prevent it from happening. In smaller systems without a charge controller, you will need a blocking diode to prevent battery discharge through reverse current flow.
To understand this, keep in mind that electricity always flows from high to low voltage. Now, consider the night-time scenario when the solar panels are not generating any power. Since the panel voltage is zero, a current can start flowing in the reverse direction, that is from the battery to the panels. The charge controller prevents this reverse flow and increases the battery uptime.
So if winters are long where you are, you know what to do.
Under-Voltage Protection
Remember the high-voltage disconnect (HVD) from above?
Well, there’s a low-voltage disconnect point (LVD) as well. And the undervoltage protection offered by the controller is determined by that point.
A controller does this by setting a point where it disconnects the battery to prevent it from going too low. As you’re probably aware, most batteries work best if you don’t let them go below 60-80% of their capacity. If you wait until it’s completely drained, it can cause some harm to the insides of the battery. So the controller helps protect your battery from getting damaged.
Note, installing any built-in overload protection does not mean that you won’t need an external fuse or circuit breaker for the system. So, make sure to follow the manufacturer’s instructions or the National Electrical Code for any solar installation.
Displays and Metering
That’s right, you’ll get yet another screen.
At first glance, you might get confused by the wide range of information provided by the LCD display in a charge controller unit. But, the live status information is extremely helpful in monitoring the various parameters of your solar power setup. Some smart controllers also have an in-built Bluetooth module that allows you to connect with it via an app.
These displays include real-time data on solar watts being generated, voltage levels, battery charged percentage, discharge time, and more. In addition, some charge controllers come with an in-built memory. This allows you to view historical information and save events or set an alarm. A look at the event history can be helpful for troubleshooting the system.
Some controllers for lead-acid batteries also have temperature compensation. This means they have a temperature sensor that adjusts the performance based on battery temperature.
However, if you have a separate system monitor for solar power, you won’t need a charge controller with a digital display.
Types of Solar Charge Controllers
There are two main types of solar charge controllers that are used. While they provide similar functions, the methods of functioning are different.

To help you choose between the two types, here’s a table that highlights the main differences.
| PWM Charge Controllers | MPPT Charge Controllers |
| They are a cheaper option and are available at prices around $10-$50. However, wiring costs for connecting multiple panels in parallel are higher. | These are more expensive with starting prices around $100. |
| Best for smaller installations between 200W- 400W | Best suited for medium to large solar power systems, Versatile enough to allow future panel addition. |
| Efficiency is around 75% as some panel output is wasted | Peak energy efficiency can be as high as 90% or more, as they can use the entire output of the panels |
| It is a passive system | A more advanced system with algorithms that track the output |
| Smaller size and longer life due to simple design and fewer components. | Larger in size and relatively shorter lifespan due to more electronic components. But they have better build quality. |
| It acts as an on/off switch between the solar panel and the battery. | It works as a DC to DC transformer by converting a higher panel voltage into a lower battery voltage |
| Best used in moderate to high-temperature conditions | Can be used in extremely low or high temperatures and in conditions of partial shading |
PWM Type Controller
A PWM (pulse width modulation) charge controller is a simple and cheap option that switches the power flow from the solar panels on and off at a fast rate. This reduces the average voltage being supplied by the panels irrespective of their output. In other words, it modifies the input waveform by altering the frequency levels.
The more the battery is charged up, the higher the frequency modulation, thereby reducing the input. Once the battery is fully charged, the controller will reduce the charging to a trickle and maintain the battery at 100% charge level.
The simple mechanism and lower costs of the PWM charge controllers make them great for small-scale solar installations like home systems. The problem is, the process leads to a significant loss of the energy generated by the panels.
As a result, the maximum efficiency of PWM controllers is around 75%. For large solar installations with higher outputs, such losses are unacceptable.
MPPT Type Controller
MPPT or Maximum Power Point Tracking controllers are more complex in design which makes their functioning more difficult to explain. So bear with me while I’m trying!
Basically, these controllers allow the solar panels to operate at the maximum power point (MPP), which is a specific point in the current-voltage (I-V) curve.
MPPT controllers keep a close eye on both the battery and panel voltage to determine the best combination for charging the battery. Then, they can boost the panel voltage to increase the gap between the panel output voltage and the battery voltage. The larger the gap, the faster the battery charging rate.
It’s like giving the battery an extra boost of energy.
Since MPPT charge controllers allow the panels to generate the maximum power depending on the conditions, they’re more efficient. That’s why they are also used in hydro-power systems and wind-power turbines.
And you know what they say: efficiency tends to break open the piggy bank. So yes, MPPT are more expensive than PWM controllers.
How to Choose a Charge Controller
Good news: the basic process of choosing a charge controller is simple. All you need to do is determine the maximum current (I) in Amps flowing through the panels by using the formula Power (W) = Voltage x Current (A).
For example, for a 200 W solar panel connected to a 12V battery, the maximum current will be 16.66 A.
But before you get going, a warning.
Solar panels can generate more power than their rated current output in some conditions like a bright cold day. So, as a safety margin, it is necessary to select a charge controller that can handle 25% more current. Otherwise, the high current can end up frying the controller.
In the above case, a 21 A charge controller should be sufficient to handle the system.
Apart from that, also check if the charge controller can handle the voltage of the battery bank you are using. Generally, they can pair with 12, 24, 36, and 48-volt batteries. Controllers that can handle both 12V and 24V batteries are versatile options.

Let’s not forget that all controllers will consume some power from the battery to operate. Generally, this is low enough and doesn’t make a difference. But if you are in an “off-grid” location where the solar panels go without sunlight for long periods, every drop of power is important. So, choosing a controller that consumes low power is a good idea.
How to Install Solar Controllers
If you are not familiar with electric circuits, it’s best to leave the installation of the controller unit, and also the entire solar setup, to experts. If you are a DIYer, check the owner’s manual of the controller to find the installation instructions.
Check the wiring diagram in the manual to find out the details about the connection process. Strictly comply with the given wiring process. Remember to connect the controller to the battery first. In case you connect it to the panels first, there’s a risk of the controller getting damaged.
When it comes to location, the controller should be installed as close to the battery unit as possible. Since batteries are usually installed in garages or power utility rooms, you should place the controller accordingly. Make sure to leave sufficient clearance around the battery for proper routing of the cables.
Always install the solar panel controller in a well-ventilated place for proper heat dissipation and away from direct sunlight. Avoid damp spots and ensure that water doesn’t get inside the unit.
Once you have selected the right system, you can expect the controllers to function for years. Since they don’t have any moving components, they don’t require any maintenance or regular cleaning that solar panels need. Periodic visual inspections are good enough to keep them running. The best quality controllers come with a 3-year warranty that ensures long-term performance.

Final Thoughts
A solar battery charger controller is a critical component of any solar-plus-storage system to safeguard the battery. Without proper control of battery charging, even the best quality batteries will fail much sooner than their normal life expectancy.
When it comes to choosing between the two types of controllers, it’s best to consider your specific situation. Considering price versus performance, PWM controllers can emerge as a better choice in some scenarios. While they are less efficient, you may not need to squeeze every watt from the panels for a small home setup. For any other situation, an MPPT controller could be a better option.
Lastly, be careful if you are looking for cheap solar panel charge regulators as low-quality products can add to your worries. Even worse, some shady sellers on Amazon may mislabel PWM controllers as MPPT controllers.
It’s down to you.


